ASSIGNMENT 3: REFLECTION
REFLECTION
 |
| The many failed attempts presented throughout assignment 1. It was not easy. |
Following the first assignment, I would have to say that each exercise presented their own unique challenges: the metal bowl was free formed and required a sophisticated build up of stretching and shrinking, starting from the outside towards the centre. The torus had to be made while maintaining curvatures that were present at opposite directions,the blister required its centre to be stretched while keeping the rest of the metal plate is intact, and lastly, shrinking and corking around the corners of the metals trays were needed in order to achieve a sharp and defined radial finish. With all these being said, there was one thing in common with all four exercises that greatly benefited my work in assignment 2: templates.
 |
| The many sample drawings done, with three presenting the need for a template. |
After a successful free forming attempt on my metal bowl, I thought I could have done the same with regards to the Torus/reverse curve. Absolutely wrong. I learned that metal is not just solid (obviously), but also delicate. It was important to understand why some parts of the metal leaves a rippling shape, while the area that was (hit with a mallet) was intact. It is because the metal piece needs to alleviate itself from the impact made from a hammer hit, therefore, shrinkage happens in effect while the hammered location is stretched out.
 |
| Nat and mine in comparison - one with a beautiful 'rippling wave' effect and one with a complete curve. |
A template, whether it is timber or something more solid, is an essential tool to have since it lays a foundation to the desired overall shape of the metal at the end. In this instance, with something as precise as the hollow curvature of the Torus's centre, free forming it (like the metal bowl) would have been a difficult process to undertake since the direction of shrinkage would go in all sorts of directions without a template to guide it in the first place.

By creating a template beforehand would not only be time efficient, but also safe. Therefore, I've applied this same technique when creating the blister templates for my fuel tank. The blister templates were ideal in helping me achieve an the overall shape of the top part of the tank, then afterwards, I can free form the edges and so forth. This is why templates are an essential component to have when working with any metal that has a complex shape.
 |
| Same principal of shaping metal around templates applied in assignment 2. Three attempts were made using the same template. |
 |
| Goal of templates is to create an overall shape to work around afterwards, which in my case, free forming the edges to complete the fuel tank part. |
 |
| Iron cylinder leaving unpleasant finish. Learning to know which tool is best for each assignment. |
Through my experience with making my trays in assignment 1, I've learned that dents and scratches on the surface would be difficult to fix, and I have learnt this the hard way through my choice of tools. After painstakingly shrinking the corners around the '30mm radius' tray (using a nylon mallet first, then planishing hammers to flatten the edge), I could have simply left it there. However, my curiosity has led me to try taking it an step further by sharpening the corners with an iron cylinder, which later proved to be a mistake. During that time, the iron cylinder left visible dents in the middle, where it use to be rightfully flat (thanks to the timber template used to shape the tray).
I worked on my tray with my partner, Nat, and we approached our trays differently. Nat avoided the use of any metal or iron tools and only used a wooden mallet, sandwiched timber templates and a nylon mallet, while I also did the same but later added the iron cylinder and planishing hammer. The results were starkly different in terms of the flat surface (image below).
I worked on my tray with my partner, Nat, and we approached our trays differently. Nat avoided the use of any metal or iron tools and only used a wooden mallet, sandwiched timber templates and a nylon mallet, while I also did the same but later added the iron cylinder and planishing hammer. The results were starkly different in terms of the flat surface (image below).
 |
| Me and my partner's work comparison: The difference is very visible, despite both being at the same radius. |
What I've learned is that in order to achieve the best finish of any metal, I needed to be careful with the tools I use (with regards to the material) that would cause minimal effect on the metal surface, otherwise the effects would be catastrophic and very difficult to repair. Through this negative experience with the trays, I have applied this knowledge through my exercise for assignment 2, where I avoided the use of little to no metal tools to shape my part, and the polished result of the surface turned out very well with no visible signs of dents nor scratches.
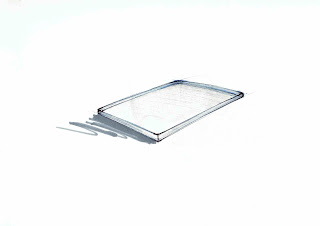
 |
| Using the right tools (that causes minimal effect on the aluminium surface), the finish was a lot better than previous exercises. |
In re-examining my view on the shaping metal for model making purposes, I had to take the road of undergoing this course. I've learned that metal is a delicate material that requires thorough planning and precision. The use of templates is essential in shaping the overall form of the metal and using the right tools for shaping would save time as it would have minimal effect on the metal's surface. Metal shaping was no longer an unknown territory for me, it is a valuable knowledge to have when thinking of making other future models for clients. This course has helped me learn to be unafraid to take a second at other preconceptions I carried. Thanks to the tutors and this course, I would gladly apply what I have learned into my profession as a designer.

Comments
Post a Comment